Schoggiweggli
- Mar 25, 2021
- 4 min read
Updated: Sep 1, 2022
What happens when you pair a milk bun with luscious dark chocolate? Magic, that's what happens!
When we lived in Basel, Switzerland, these Schoggiweggli were my kids’ favorite treat!
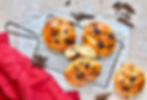
Schoggiweggli is the Swiss-German name for a milk bun with chocolate (btw, the w is pronounced like an english v) and they are the benchmark of every bakery in Basel. At least they were for me! They’ve gotta be soft, the chocolate chunks have to be big and hand chopped (no dinky chocolate chips, please!) and they can’t be too sweet. And it wouldn’t be a Schoggiweggli without the groove down the middle.
I used a recipe for regular Weggli by Judith Erdin of streusel.ch that I’ve made a few times, just added dark chocolate and am verrrrry pleased with the results! Can you imagine how popular I was at my house? Lots of gold stars for this Mummy! This recipe was even featured by educational resource publisher Twinkl in their Basel guide, which you can find here: Twinkl Basel Guide.
There are a fair few steps on the road to Schoggiweggli nirvana, but they are well worth it. The good news is that you can definitely employ a stand mixer with a dough hook to do the heavy work for you and also quite a bit of the time it takes to make these is hands off proofing time.
How wonderful would these be for your Easter brunch?
xoxo Donata
Ingredients
Makes 15
3 cups + 2 tbsp (500 g) all purpose flour
1 tsp (6 g) salt
1 1/2 tsp (9 g) sugar
1 tsp (6 g) malt extract or molasses
1,1 oz (30 g) fresh yeast
1 1/3 cups (330 ml) whole milk
4 tbs (55 g) cold butter, cut into little cubes
7 oz (200 g) dark chocolate, chopped into chunks
Egg wash
1 egg yolk
1 tbsp whole milk
Preparation
Place the flour, sugar and molasses (or malt extract) in the bowl of a stand mixer fitted with a dough hook.
Crumble the fresh yeast and add.
Pour in the milk and mix on low for five minutes until a dough has formed.
Add the salt and then the butter cubes bit by bit and continue to knead on low for a further 5 minutes.
Raise the mixing speed to medium and knead for another 5 -7 minutes. Do the windowpane test to see if enough gluten has formed: take a small ball of dough and stretch it out in all directions with your fingers. If you can pull it into an almost translucent pane without it breaking, then it is ready to rise. If it breaks, knead the dough for another two minutes and try the windowpane test again.
When the dough is ready to rise, add most of the chocolate chunks (save about 1/4 cup as garnish) and knead through once more to distribute the chunks.
Leave the dough in the bowl of the stand mixer and cover with cling film. Let rise at (warmish) room temperature for 30 minutes.
Line two or three baking sheets (depending on how big they are) with parchment paper.
When the dough has risen (it should just about have doubled in size), weigh out 15 pieces of each about 2,5 oz (70g).
Form into round buns by pulling the dough over and under, tucking it into a round seam on the underside of the bun.
Lay onto the prepared baking sheets. The Schoggiweggli should not be crowded, so use three baking sheets if you need to.
Loosely cover with cling film and let rest for 30 minutes.
Use something cylindrical and thin, like a round pencil (for me the rounded handle of my bench scraper works very well), to press an indentation into the Schoggiweggli, all the way down to the bottom of the bun without pressing all the way through. Work around the chocolate chunks.
Cover with the cling film again and let rest for another 15 minutes.
Combine the egg yolk with a tablespoon of milk in a small bowl and, when the 15 minutes are up, baste the Schoggiweggli with half of the egg wash.
Let rest uncovered for further 30 minutes.
Preheat oven to 425 F (220 C).
Baste with the remaining egg wash. Dot with the chocolate chunks you set aside.
Place two baking sheets in the oven and lower the temperature to 395 F (200 C).
After two minutes, spray the sides of the oven with plenty of water and immediately close the door again. If you don’t have a spray bottle for water, pour a 1/4 cup of water right onto the bottom of the oven (watch out for the steam!) and close the door right away.
Bake for seven minutes.
Then switch out the baking sheets to ensure that all the Schoggiweggli bake evenly.
Bake for a further 8 minutes or until golden brown.
If you have a third baking sheet, repeat the baking steps (except for the switching part).
Let cool on the baking sheets before serving.
These are best the day you bake them and still delicious the following day. They freeze well. Defrost at room temperature and then pop them into the oven at 350 F (190 C) for a few minutes to get them all nice and toasty.


Adapted from a recipe by Judith Erdin, www.streusel.ch